
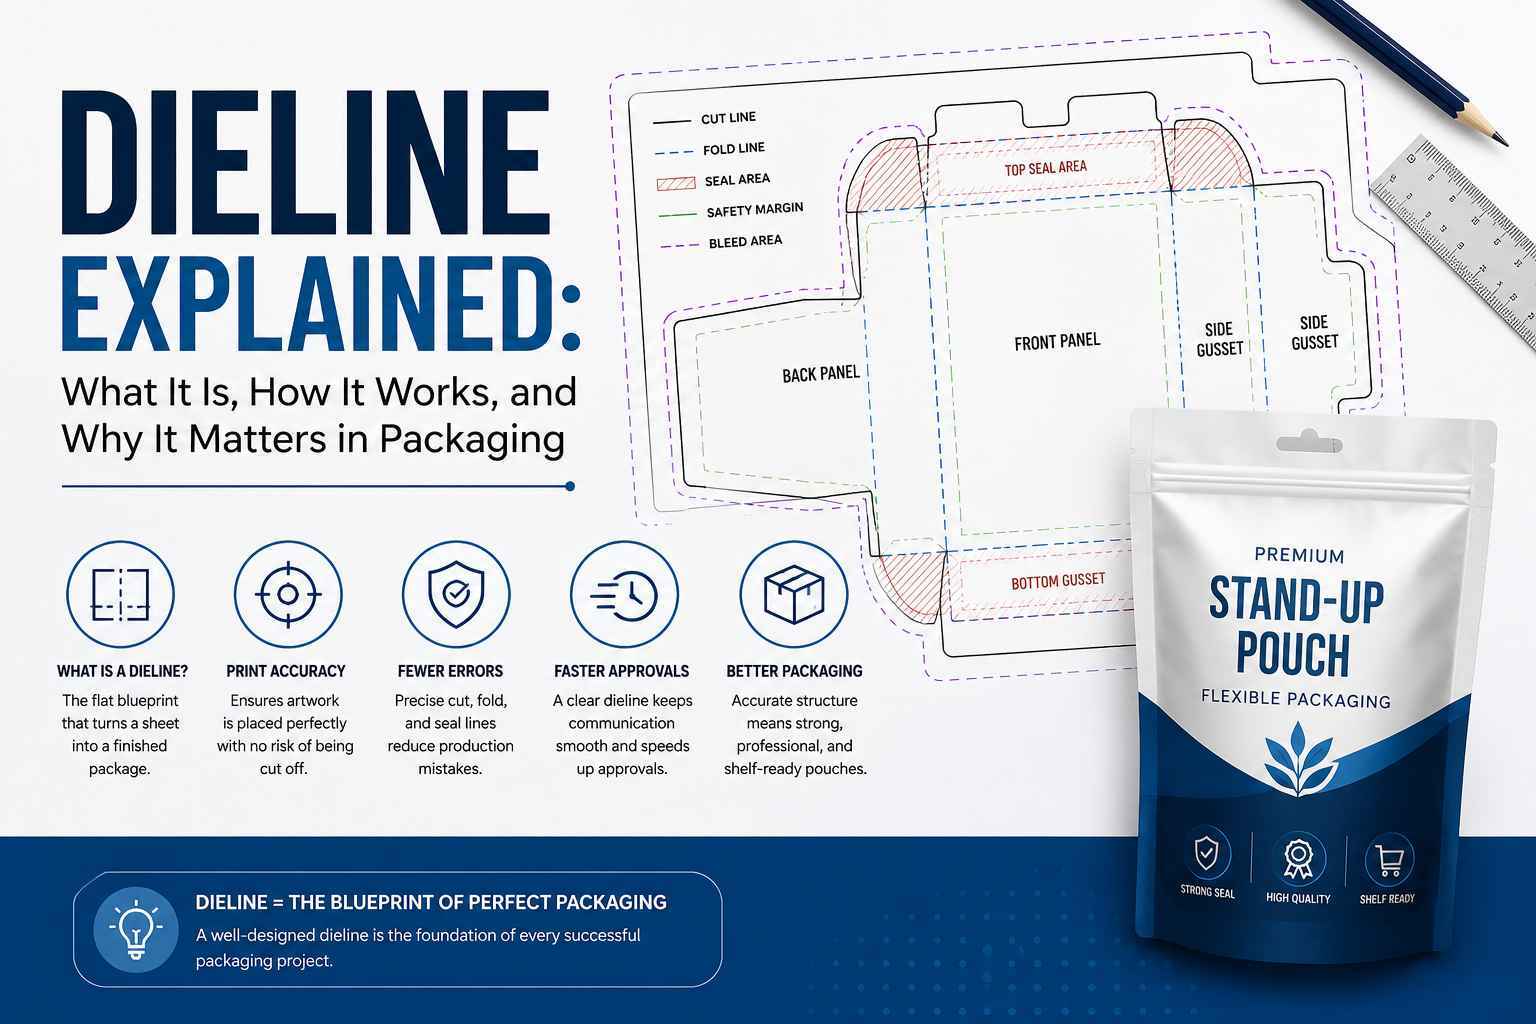
Every pouch or flexible package starts as a flat piece of material before it becomes a finished package. The plan that shows exactly where that material gets cut, sealed, and folded is called a dieline. This guide breaks it down in plain terms, from the basic definition to how professionals build and read one in real production.
What Is a Dieline?
It is essentially the flat blueprint that shows where packaging will be cut, sealed, creased, and folded during production. It is not the artwork itself. It is the technical map that the artwork sits on top of, and every printer or pouch manufacturer relies on it to turn a flat sheet into a finished shape.
The simple word’s dieline is a two-dimensional drawing that represents the three-dimensional structure of a package before it is assembled. Some designers also use the term dieline to describe the same idea: a flat guide that tells a machine exactly where to cut and where to fold.
What Is a Dieline in Packaging?
In packaging work, this document acts as the shared language between the design team and the factory floor. It marks every panel, seal area, and edge so the finished pouch comes together correctly, with no guesswork left for the person operating the cutting equipment.
What Is a Dieline in Printing?
On the print side, the same file tells a printer where the artwork needs to sit so nothing important gets trimmed off or hidden behind a fold. Without it, a printer has no reliable way to line up colors, text, and images with the exact shape of the final package.
Why Dielines Matter In Packaging Production
A clear dieline cuts down on production errors before they happen. When cut lines, seal areas, and fold points are marked precisely, there is far less chance of a pouch sealing off center or artwork landing in the wrong spot.
Print accuracy also improves once the structure is locked in early. Designers can place artwork with confidence, knowing exactly where a panel ends and a fold begins, instead of guessing at proportions and fixing problems after a sample comes back wrong.
Approvals move faster too. A well-built file brand owners, printers, and packaging engineers the same reference point, so feedback stays focused on real issues instead of confusion over basic structure. Thisgives kind of precision matters just as much for small sachets as it does for Sustainable Packaging formats, where material choices already limit how much room there is for error.
Understanding the Key Elements of A Packaging Dieline
A packaging dieline is built from a small set of consistent elements, and once you can spot them, reading one gets much easier.
- Cut lines, usually shown as solid lines, mark exactly where the material gets sliced.
- Fold lines, often dashed, show where the material creases without being cut through.
- Bleed areas extend the artwork slightly past the cut line so there is no white edge after trimming.
- Safety margins keep important text and logos away from the edges where trimming can shift.
- Seal areas mark the sections that get heat sealed to hold the finished pouch together.
These elements appear consistently across most flexible packaging formats, whether the project is a small sachet or a large stand-up pouch.
Reading the Structure The Right Way
Reading one of these files starts with identifying the production marks. Solid lines mean cutting, dashed lines mean folding, and any dotted or colored overlay usually points to bleed or safety zones that need attention before the file goes to print.
Understanding the panel layout comes next. Each panel represents a visible side of the finished package once it is assembled, so designers need to think about how text and images will look once the flat sheet folds into its final shape. Every packaging dieline follows this same logic once you know where to look.
Avoiding artwork placement errors is often the hardest part for anyone new to packaging design. A logo that looks perfectly centered on the flat file can end up split across a fold or seal line once the pouch comes together, which is why checking a folded mockup matters just as much as checking the flat layout.
Common Structural Types To Know
Stand-up pouch structures are probably the most common request, used for everything from snacks to pet food. They typically include a bottom gusset that lets the finished pouch stand on a shelf without extra support.
Flat or pillow pouch structures are simpler in shape, sealed on three or four sides depending on the format. These files still need careful attention to seal width and fill area, since the pouch has to survive handling and transport without a rigid gusset to lean on.
Gusseted pouch structures add side folds for extra volume, which changes how artwork wraps around the pouch once it is filled. Getting the gusset panel width right on the flat file matters just as much as getting the front panel right.
Sachet and stick pack structures cover single-serve formats, including powder sachets and small liquid pouches sold alongside full-size Stand Up Pouches on the same shelf. These files account for tight seal areas and small print zones instead of large folding panels, which makes them a bit different to plan than a full-size pouch.
Some pouch projects also start life as Digital Printed Pouches, where shorter print runs and quick turnaround make it easier to test a new structure before committing to a large production order.
What Is A Dieline Template?
A dieline template is a reusable structural file built for a standard pouch shape, like a common stand-up pouch size or a standard sachet format. Instead of building a new structure from scratch every time, designers can drop new artwork onto a template that has already been tested.
Templates save real time on repeat projects, especially for brands that release new flavors or variants of the same pouch size. Custom structures still make sense for anything unusual, like an oddly shaped gusset or a specialty spouted pouch, but a standard template usually gets a straightforward product to market faster.
The Dieline Design Process
Dieline design starts with the product dimensions. Length, width, height, and any internal fittings all shape how the flat structure needs to be laid out before anything else happens.
From there, the structural layout comes together, followed by technical specifications like material thickness, coating requirements, and any special finishing. Industry professionals often stress separating structural planning from artwork placement early in the process, since fixing a folding problem after the artwork is finished usually means starting over.
The last step is testing a physical prototype. A flat file can look correct on screen and still fold incorrectly in real material, so a sample run catches problems no amount of digital review can fully replace.
Examples Across Different Packaging Formats
A stand-up pouch example usually includes a front panel for branding, side gussets for shelf stability, and a top seal built for easy tear or resealing. A food packaging example often adds extra safety margins around ingredient lists and nutrition panels, since regulations leave little room for error near the edges.
A sachet packaging example looks completely different, built around a small sealed pouch rather than a larger gusseted format. Projects using Custom Sachet Packaging often need tighter tolerances, since a small format leaves very little space for adjustment once printing starts.
A stick pack example, by contrast, focuses on portion control more than shelf presence. Flexible Packaging formats like these still need both structural accuracy and enough print space for a brand to stand out on a shelf.
Common Structural Mistakes To Avoid
A few mistakes show up again and again in packaging projects, and most of them are easy to prevent once a designer knows what to check for.
- Ignoring bleed requirements, which leaves white edges after trimming
- Placing text too close to the edges, where it risks being cut off
- Getting fold line placement wrong, which throws off the whole structure
- Using non-vector files, which lose sharpness once the file is scaled for production
Packaging professionals often point to a clear separation of cut lines, folds, bleeds, and safe zones as the clearest sign of a well-built file.
How This Connects To The Die Cutting Process
Die cutting is the physical step where a cutting tool, shaped to match the file, cuts and seals the flexible film to create the finished pouch shape. The file essentially becomes the blueprint the tooling is built from.
Getting from a flat layout to a finished pouch involves cutting, sealing, and often folding a gusset, all guided by the same reference file used during design. Quality checks before full production, like a short test run, catch structural problems while they are still cheap to fix.
How This Supports Modern Packaging Solutions
Better collaboration between designers and printers is one of the clearest benefits. When everyone works from the same structural file, fewer details get lost in translation between departments or outside vendors.
Product launches also move faster when the structural work is settled early, since teams are not stuck revising basic shape decisions late in the process. This kind of process discipline shows up across formats, including Flow Wrap Packaging, where speed and consistency matter just as much as they do for pouches and sachets.
Consistent quality across print runs is the long-term payoff. Companies like Contipack Inc rely on well-documented structural files to keep packaging uniform, whether an order runs a few hundred units or several hundred thousand.
Frequently Asked Questions
Q1: What is a dieline in packaging?
It is the flat technical drawing that shows where a package gets cut, folded, and glued, giving printers and manufacturers an exact structural guide before production starts.
Q2: What is a dieline in printing?
It tells the printer exactly where artwork needs to sit so nothing important gets trimmed away or lost behind a fold once the package is assembled.
Q3: What are dielines used for?
They are used to plan the exact shape and structure of packaging, from simple sachets to complex stand-up pouches, before any material gets cut or printed.
Q4: What is a dieline template?
It is a reusable structural file built for a standard package shape, letting designers apply new artwork without rebuilding the structure from scratch each time.
Q5: How do you create a packaging dieline?
The process usually starts with product dimensions, moves into structural layout and technical specifications, and finishes with a physical prototype to confirm everything folds correctly.
Q6: What software is used for dieline design?
Most designers work in vector-based programs like Adobe Illustrator, since vector files scale cleanly and stay sharp no matter how the final package size changes.
Final Thoughts On Dielines
A dieline is not the most exciting part of packaging design, but it is the part everything else depends on. Get the structure right, and the artwork, printing, and final assembly tend to fall into place with far fewer surprises.
If you are working on a new package, start with the structural file before spending too much time on visuals. A tested, accurate structure saves time on approvals, avoids costly reprints, and gives every product a much better shot at looking right the first time it comes off the production line.