
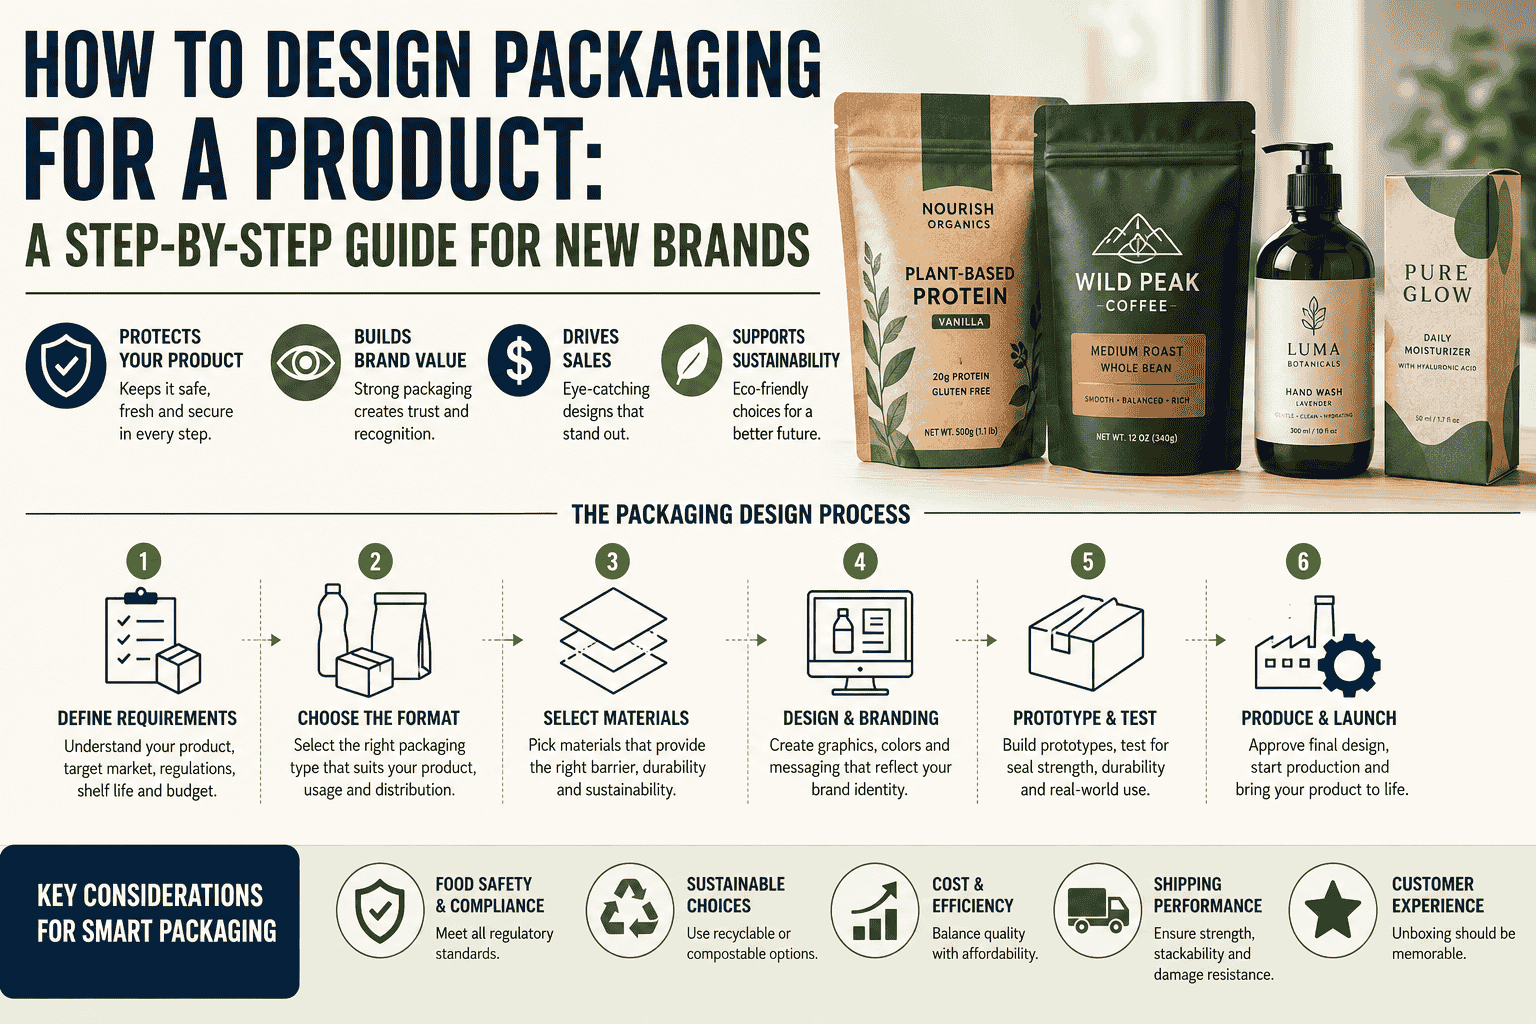
Launching a new product is exciting, but a lot of first-time founders get stuck at the same point the packaging. If you are wondering how to design packaging that actually protects your product and gets noticed on a shelf, you are not alone. Most new brands either overspend on packaging they do not need or underspend on packaging that fails in shipping. This guide walks through the entire process, step by step, so you can make smart decisions from the very first sketch to the final printed box.
What Is Product Packaging Design?
Product packaging design is the process of planning the structure, material, graphics, and function of the container that holds and presents a product. It covers everything from the shape of a pouch to the placement of a nutrition panel, and it sits at the intersection of engineering, marketing, and compliance.
A useful way to think about it is in three layers. The structural layer decides the shape, size, and closure. The material layer decides what the package is made of and how it performs against moisture, oxygen, and impact. The graphic layer decides the colors, typography, and messaging that a shopper sees first. Good packaging design treats all three layers as connected, not separate projects handled by different people at different times.
Why Packaging Design Deserves Real Planning?
New brand owners often treat packaging as an afterthought. They build the product first, then scramble to find a box or bag at the last minute. That order of operations causes problems later. Packaging affects your shipping costs, your shelf presence, your unboxing experience, and how long your product actually stays fresh.
Learning how to design packaging early means you can build your product formulation, your budget, and your branding around a package that works, instead of forcing a package to work around decisions you already made. This single shift in mindset saves most brands thousands of dollars in reprints and redesigns.
Think about the last time you ordered something online and the box arrived crushed, or the pouch had split at the seam. That kind of experience sticks with a customer far longer than a clever tagline ever will. Good packaging is quiet infrastructure. Nobody notices it when it works, but everyone notices when it fails.
This guide is written for founders who are past the idea stage and moving toward production. Maybe you have a working formula, a name, and a rough sense of your target customer, but you have not yet locked in how the product will actually be packed, shipped, and displayed. That is exactly the stage where the decisions below matter most.
Step 1: Get Clear on Your Packaging Design Requirements
Before you sketch a single logo or pick a color palette, sit down and list your actual packaging design requirements. What does the product weigh? Is it a liquid, a powder, a solid, or something that needs to stay frozen? Will it ship direct to consumers, go through a distributor, or sit on a retail shelf?
These questions sound basic, but they shape every decision that follows. A skincare brand shipping glass jars has completely different requirements than a snack company shipping bagged chips. Write your requirements down before you talk to any designer or supplier, because it keeps the conversation focused and saves everyone time.
At this stage, it also helps to think about regulatory labeling. Food, supplements, and cosmetics all carry specific labeling rules depending on where you sell. Missing a required nutrition panel or allergen statement is one of the most common and most expensive mistakes a new brand can make.
Storage conditions matter just as much as shipping conditions. A product that sits in a hot warehouse for weeks before it ships needs a different barrier layer than one that moves straight from production to a climate-controlled retail store. Ask your supplier what temperature and humidity range the packaging is rated for, and compare that against your actual storage plan rather than an ideal-case scenario.
Shelf life targets should also be part of this early conversation. If your product needs to stay fresh for twelve months, that requirement drives the oxygen transmission rate and moisture barrier of the film you choose. Skipping this step and picking a film based on look alone is how brands end up with stale product complaints a few months after launch.
Step 2: Match the Format to the Product
Once you know your requirements, you can start narrowing down formats. Rigid boxes work well for stackable retail products. Bottles and jars suit liquids and creams. For food and snack brands, pouches are usually the more practical and cost-effective route.
The table below gives a quick side-by-side comparison of the most common formats new brands consider.
| Format | Best For | Relative Cost | Shelf Presence |
| Pouch | Snacks, powders, pet treats | Low | High |
| Box | Retail products, bundled goods | Medium | High |
| Bottle | Liquids, oils, sauces | Medium | Medium |
| Jar | Sauces, creams, preserves | High | Premium |
Flexible Packaging has become the default choice for a huge range of products because it weighs less, ships cheaper, and takes up less warehouse space than rigid alternatives. A pouch that seals well and stands upright on a shelf often outperforms a box on both cost and how quickly it catches a shopper’s eye.
If you are working with snacks, coffee, pet treats, or any dry goods, a Side Gusseted Bag gives you a wide base for standing display along with strong seals for freshness. It is one of the most requested formats among new food brands because it photographs well for e-commerce and holds up during transit.
Food pouch packaging design is its own specialty. The seal integrity, the barrier layer, and the zipper or tin-tie closure all need to match how the customer will actually use the product, whether that means one sitting or repeated opening and closing over several weeks.
Beverage brands face a different set of format questions entirely. Spouted pouches, aseptic cartons, and bottles all handle liquid differently under pressure and temperature change, so a format that works for a shelf-stable juice may not hold up for a refrigerated product. Testing the format under real shipping conditions, not just on a warehouse counter, tells you whether a seal will actually survive the trip to a customer’s door.
Weight is another factor that gets overlooked until the freight bill arrives. Rigid packaging often costs more to ship simply because it weighs more and takes up more space per unit in a truck or container. For brands shipping direct to consumers, that extra freight cost adds up fast across thousands of orders, which is one more reason so many food and snack brands eventually move toward pouch-based formats.
Choosing Packaging Materials for Your Product
Material selection is where a lot of the real engineering happens, even though customers never see this part of the process. Every film or board option carries a different balance of barrier protection, cost, and printability, and the right choice depends entirely on what is inside the package.
Multi-layer laminated films are common in food packaging because each layer does a specific job. One layer might block moisture, another might block oxygen, and a third carries the print. Mono-material structures are gaining ground because they simplify recycling while still offering solid barrier performance for many dry and shelf-stable products.
Paperboard and kraft-based structures suit brands that want a natural look and are willing to trade some barrier performance for a lower environmental footprint. These materials work well for products with a shorter shelf life or ones that will be stored in cooler, drier conditions.
Whatever material you land on, ask your supplier for a data sheet showing oxygen transmission rate, moisture vapor transmission rate, and seal strength. These three numbers tell you far more about real-world performance than a swatch or a sample photo ever will.
Build Sustainability Into the Design, Not Onto It
Shoppers increasingly check labels for recyclability and material sourcing before they buy, especially in the food and beverage category. Sustainable food packaging design is not just a marketing checkbox anymore. It is a factor that shows up in purchase decisions and in retailer requirements.
The mistake most brands make is treating sustainability as a label they add after the packaging is finalized. A better approach is choosing recyclable films, mono-material structures, or compostable options during the material selection stage, so the finished package is genuinely eco-friendly product packaging rather than packaging with a green sticker on it.
Sustainable Packaging does not have to mean a weaker seal or shorter shelf life. Modern barrier films can hold up against moisture, oxygen, and light while still meeting recyclability standards. Ask your supplier for material data sheets early so you can compare real performance numbers instead of relying on marketing claims.
Retailers are also tightening their own packaging policies, and some large grocery chains now require a recyclability or sustainability plan before they will even review a new product for their shelves. Building this into your packaging design requirements from the outset means you will not have to redo your entire package structure just to meet a retailer’s checklist a year after launch.
It also pays to think about the secondary packaging, not just the primary bag or bottle. Shipping cartons, void fill, and shrink wrap all carry their own environmental footprint, and eco-friendly product packaging that ignores the outer layers is only solving half the problem for a customer who cares about waste.
How Product Branding and Packaging Work Together?
Product branding and packaging are often treated as two separate workstreams, one handled by a marketing team and the other by an operations team. That split creates friction, because the graphics a designer wants may not fit the structure an engineer has approved, and vice versa.
The strongest packaging happens when brand identity and structural design are developed side by side. Your logo placement, color palette, and messaging hierarchy all need to work within the real constraints of the film or board, the printing method, and the size of the panel available for graphics.
Consistency matters as much as creativity here. A customer who buys your product online should recognize the same look on a store shelf, and a customer who tries a new flavor or size should immediately know it belongs to the same brand family. Building a simple style guide early, covering colors, fonts, and logo usage, keeps that consistency intact as your product line grows.
Work Through the Full Packaging Design Process
The packaging design process usually runs through five stages: concept sketches, material selection, structural prototyping, print and branding, and final production testing. Skipping stages to save time almost always costs more later, because a print run based on an untested structure often needs to be redone.
Concept sketches should reflect your actual brand story, not just trends you saw on a competitor’s shelf. Custom product packaging design needs to work hand in hand with your branding from day one, since the colors, fonts, and imagery on the package are often a customer’s first physical interaction with your brand.
A packaging prototype is where a lot of new brands get impatient, but this step catches problems that are expensive to fix after printing. A pouch that looks great as a digital mockup can seal poorly or tear at the corners once it is filled and shipped. A short prototyping round protects you from a much larger reprint bill down the line.
Custom product packaging design also needs to account for your filling equipment. A beautiful pouch design is worthless if it cannot run on your co-packer’s filling line at the right speed. Share your equipment specs with your packaging supplier before locking in dimensions.
Color accuracy is another detail that trips up new brands during this stage. What looks right on a computer screen can shift once it is printed on film or board, since screens and printers use different color systems entirely. Requesting a physical proof before a full print run, rather than approving off a digital file alone, catches color mismatches while they are still cheap to fix.
Typography and label layout deserve the same level of attention as the graphics. Regulatory text, ingredient lists, and barcodes all need dedicated space that does not compete with your logo or product imagery. Planning that layout early, rather than squeezing required text in at the last minute, keeps the final package looking organized instead of cluttered.
Choose a Manufacturing Partner That Understands Your Category
Not every packaging supplier understands every product category. Custom product packaging manufacturers who specialize in food, beverage, or personal care will know the compliance rules, barrier requirements, and typical failure points for your specific type of product, which saves you from learning those lessons the expensive way.
Contipack Inc works with food and consumer goods brands across North America on exactly this kind of category-specific packaging, from early material selection through full production runs. Working with a manufacturer who already offers full packaging design solutions, not just printing, means fewer surprises once you move from sample to full production.
The Food & Beverage sector in particular has tight requirements around barrier protection, shelf life, and labeling compliance, so a manufacturer with direct experience in that space tends to catch issues that a general packaging vendor might miss entirely.
Some categories need even more specialized handling. Baby food packaging, for example, carries strict safety and material standards because of who the end consumer is, and any supplier working in that space needs to demonstrate a clean compliance record before you sign off on a run.
The same goes for powders. Custom Dairy Powder Packaging needs moisture barriers and often requires specific valve or zipper features to keep the product free-flowing after the bag has been opened and reclosed multiple times.
Dry goods present their own challenges too. Pasta Packaging has to balance a clear window or printed graphic that stands out on the shelf with a seal strong enough to survive stacking and transit without tearing at the corners.
Common Mistakes New Brands Make
A few mistakes show up again and again with first-time brand owners. The first is picking packaging based on price alone, without testing how it performs once filled and shipped. The second is skipping a real prototype and going straight to a full print run, which turns a small design flaw into a very large and costly reprint.
The third mistake is underestimating lead times. Custom packaging, especially anything printed with your own branding, often takes several weeks longer than a stock option. Planning your launch date around your packaging timeline, rather than the other way around, prevents a lot of last-minute stress.
The fourth mistake is ignoring how the package performs on camera. Since so much shopping now happens online, your packaging needs to look sharp in a small product photo or thumbnail, not just in person on a store shelf.
A fifth mistake worth mentioning is treating your first supplier quote as final. Packaging costs vary widely depending on order volume, material choice, and print complexity, and a second or third quote often reveals savings that a first-time brand owner would not have known to ask for. Comparing at least two suppliers on the same specification sheet also gives you a clearer sense of what a fair price actually looks like for your category.
Minimum order quantities catch a lot of new brands off guard as well. Custom printed packaging almost always requires a minimum run size to be cost-effective, and that minimum can tie up more cash than a small brand has available. Asking about lower minimum options, or starting with a simpler unprinted structure and a printed label, is a practical way to test a product before committing to a full custom print run.
Packaging Design Checklist Before You Print
Before you sign off on a full production run, run through this short checklist to catch the issues that are cheapest to fix now and most expensive to fix later.
Confirm your product weight, dimensions, and fill method match the structure you have chosen. Confirm your material meets the shelf life and storage conditions you identified in step one. Confirm all required regulatory text, nutrition panels, and barcodes are placed and legible. Confirm you have approved a physical proof, not just a digital mockup, for color accuracy. Confirm the packaging has been tested on your actual filling equipment at production speed. Confirm your minimum order quantity and lead time fit your launch timeline and budget.
Frequently Asked Questions
Q1: How do I design packaging for a new product?
Start by defining your product’s physical requirements, such as weight, format, and shelf life, before moving to material selection and graphic design. Prototype the structure before committing to a full print run, and work with a supplier who understands your product category.
Q2: What should be included on product packaging?
At a minimum, product packaging should include the product name, net weight or volume, ingredient or material list, any required regulatory statements, and contact information for the brand. Beyond the legal requirements, strong packaging also includes clear branding elements that help a customer recognize the product quickly.
Q3: What is the packaging design process?
The packaging design process typically includes concept sketches, material selection, structural prototyping, print and branding development, and final production testing. Each stage should be reviewed before moving to the next, since fixing a problem early is far cheaper than fixing it after a full print run.
Q4: How much does packaging design cost?
Cost depends heavily on the format, material, print complexity, and order volume. Simple stock pouches with a printed label cost far less than fully custom printed structures, and minimum order quantities can significantly affect the per-unit price at smaller volumes.
Q5: Why is packaging important?
Packaging protects the product during shipping and storage, communicates the brand to a shopper in the first few seconds of contact, and often determines whether a product survives the trip from a warehouse to a customer’s door without damage.
Final Thought
Learning how to design packaging is really about sequencing your decisions correctly. Start with your product requirements, choose a format that fits your category, build sustainability in from the start, work through a real design and prototyping process, and partner with a manufacturer who knows your product type. Brands that follow this order end up with packaging that performs well in shipping, looks good on a shelf, and holds up to real customer use.
If you are still early in planning, resist the urge to jump straight to graphics and colors. The structural and material decisions you make first are what determine whether your packaging actually works, and getting those right is the real answer to how to design packaging that supports your brand for the long run.
Need help creating custom packaging for your new product? Contact Contipack Inc to discuss packaging materials, branding, and manufacturing options tailored to your product and market.